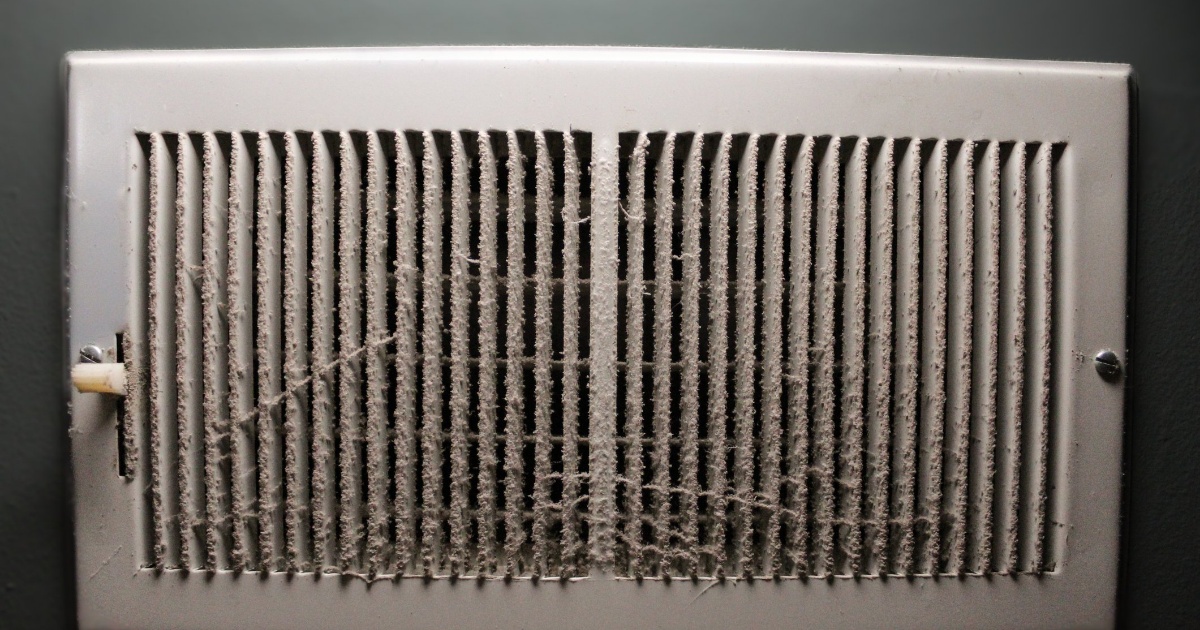
Understanding the Problem: How Construction Dust Invades Your HVAC
The Infiltration Process
During any construction or renovation project involving drywall, dust infiltrates your HVAC system through several pathways:
1. Return Air Vents
- Return vents create negative pressure, actively sucking in air
- Construction dust gets pulled directly into your ductwork
- Even with plastic sheeting, dust finds its way in
- The more powerful your system, the more dust it pulls in
2. Supply Vents
- While blowing air out, dust can enter when system is off
- Dust settles on vent surfaces and gets blown in when system restarts
- Protective coverings are rarely perfectly sealed
3. Air Handler and Filter Access
- Opening your system for filter changes during construction
- Dust enters through any unsealed access points
- Gaps around filter housing let dust bypass filters
4. Ductwork Seams and Leaks
- Most duct systems have small leaks at seams and joints
- Construction dust in attics and crawlspaces gets sucked into these leaks
- Older systems with deteriorated seals are particularly vulnerable
Why Drywall Dust Is Especially Problematic
Drywall dust behaves differently than other types of dust:
Ultra-Fine Particle Size:
- Drywall compound particles are 2-10 microns (human hair is 70 microns)
- Small enough to remain airborne for hours
- Penetrates deep into ductwork and system components
- Standard air filters can't capture particles this small
Static Electric Charge:
- Drywall particles carry electrical charge
- Makes them stick to duct surfaces
- Harder to dislodge than regular dust
- Accumulates in layers rather than settling
Volume and Density:
- Single drywall project creates pounds of dust
- Dense enough to restrict airflow in ducts
- Coats blower motors and cooling coils
- Reduces HVAC efficiency significantly
The Health and System Impacts
Health Implications
Continuous circulation of drywall dust affects health:
Respiratory Issues:
- Irritation of lungs, throat, and nasal passages
- Aggravation of asthma and allergies
- Persistent coughing and sneezing
- Particular concern for children, elderly, and those with respiratory conditions
Indoor Air Quality:
- Drywall dust contains silica (crystalline silica in some products)
- Continuous exposure to fine particulates
- Reduced air quality even with open windows
- Can take 6-12 months to naturally dissipate without intervention
Allergy and Sensitivity:
- Some people develop sensitivity to construction dust
- Symptoms persist long after construction ends
- Often mistaken for new allergies or seasonal issues
HVAC System Impact
Contaminated systems suffer multiple problems:
Reduced Efficiency:
- Dust coating on cooling coils reduces heat transfer (20-40% efficiency loss)
- Restricted airflow increases energy consumption
- Blower motor works harder, leading to premature wear
- Higher utility bills immediately after construction
Equipment Damage:
- Dust accumulation causes motors to overheat
- Coil cleaning becomes necessary sooner
- Fan blades become unbalanced from dust buildup
- Can void equipment warranties if not addressed
Filter Overload:
- Standard filters clog within days instead of months
- Reduced airflow stresses entire system
- Expensive filter replacement cycle
- Many homeowners give up and run with dirty filters
DIY Methods for Visible Vent Cleaning
What You Can Do Yourself
Homeowners can effectively clean accessible vent components:
Tools and Materials Needed
Essential Equipment:
- HEPA-filtered vacuum with hose and brush attachments
- Microfiber cloths (at least 6-8)
- Bucket with warm water and mild dish soap
- Screwdriver (to remove vent covers)
- Flashlight or headlamp
- Drop cloths or old towels
- Step ladder for ceiling vents
Optional but Helpful:
- Flexible duct cleaning brush (available at hardware stores)
- Shop vacuum with HEPA filter
- Compressed air (for detailed cleaning)
- Protective mask (N95 rated)
- Safety glasses
Step-by-Step Vent Register Cleaning
Step 1: Prepare the Area
- Turn off your HVAC system completely (thermostat and breaker)
- Lay drop cloths under vents to catch falling dust
- Open windows for ventilation
- Put on protective mask and safety glasses
Step 2: Remove Vent Covers
- Unscrew all vent covers throughout the home
- Take them outside or to garage for cleaning
- Label each cover with location for easy reinstallation
- Note: Some may have paint or caulk sealing them – carefully break seal
Step 3: Clean Vent Covers
- Shake off loose dust outside
- Vacuum both sides thoroughly with HEPA vacuum
- Wash with warm soapy water and soft brush
- Rinse completely and dry thoroughly before reinstalling
- For stubborn dust buildup, soak 15-30 minutes before scrubbing
Step 4: Vacuum Accessible Ductwork
- Using HEPA vacuum with hose attachment, vacuum as far into duct as possible
- Start with supply vents (where air blows out)
- Then clean return vents (where air gets sucked in)
- Use flashlight to see how far dust extends
- Vacuum floor/ceiling around vent opening where dust accumulated
Step 5: Wipe Duct Openings
- Dampen microfiber cloth with plain water
- Wipe visible interior duct surfaces near opening
- Change to clean cloth frequently
- Reach as far as safely possible (typically 12-24 inches)
- Let dry completely before replacing covers
Step 6: Clean Surrounding Areas
- Wipe wall or ceiling around vent opening
- Vacuum any dust that fell during cleaning
- Check for dust in adjacent trim or molding
Special Attention to Return Air Vents
Return vents are especially important:
- Usually larger than supply vents
- Often have more accumulated dust
- Direct pathway to air handler and filter
- May have multiple feet of accessible duct behind grille
Extra steps for returns:
- Remove filter if accessible from return grille
- Vacuum filter housing area thoroughly
- Check for dust on backside of filter
- Wipe interior surfaces you can reach
- Consider flexible brush to reach farther into return duct
What You Can't Reach: When DIY Isn't Enough
Limitations of DIY Cleaning
Homeowner cleaning addresses only about 20-30% of contaminated ductwork:
Areas You Can't Access:
- Ductwork running through attic, crawlspace, or walls
- Main trunk lines
- Flexible duct runs
- Plenum (main distribution box)
- Air handler interior
- Cooling coils
- Blower motor and housing
Hidden Contamination Points:
- Dust settling in horizontal duct runs
- Accumulation at duct bends and joints
- Buildup in far reaches of duct system
- Coating on interior duct surfaces throughout system
Signs You Need Professional Duct Cleaning
Consider professional help if:
- Visible dust blowing from vents after DIY cleaning
- Musty or dusty smell when system runs
- Dust reappears within hours of cleaning surfaces
- Family members have respiratory symptoms that started after construction
- Significant drywall work was performed (whole house, major room additions)
- Filters clog within days instead of lasting 1-3 months
- Visible dust accumulation inside ductwork beyond your reach
- System efficiency has noticeably decreased
Professional HVAC Duct Cleaning
What Professional Cleaning Includes
Comprehensive professional duct cleaning involves:
Pre-Cleaning Inspection:
- Camera inspection of ductwork
- Assessment of contamination level
- Identification of any duct damage or disconnections
- Testing of system airflow
Cleaning Process:
- Access Point Creation: Small access holes in main trunk lines if needed
- Negative Pressure System: Industrial HEPA vacuum creating negative pressure in ducts
- Agitation Methods: Rotating brushes, compressed air whips, or contact tools
- Section-by-Section Cleaning: Each duct run cleaned individually
- Main Components: Air handler, blower, coils, and plenum cleaned
- Sanitization (Optional): EPA-approved antimicrobial treatment if requested
Post-Cleaning:
- Sealing access holes professionally
- Filter replacement (often included)
- Final camera inspection
- System testing and airflow verification
Professional Equipment Advantage
Professional duct cleaners use specialized equipment:
Truck-Mounted or Portable HEPA Systems:
- 5,000-15,000 CFM negative pressure capability
- True HEPA filtration preventing dust re-release
- Powerful enough to pull dust from entire duct system
Mechanical Agitation Tools:
- Rotating brush systems sized for your ducts
- Compressed air whips (like a pressure washer for ducts)
- Skipper balls and other contact tools
- Camera systems for inspection and verification
Access and Sealing Equipment:
- Specialized tools for creating and sealing access points
- Ensures system remains sealed and efficient after cleaning
Cost vs. Benefit Analysis
Typical Phoenix costs:
- Basic duct cleaning: $300-500 for average home
- Comprehensive post-construction cleaning: $400-700
- With coil cleaning and sanitization: $600-900
Benefits received:
- Immediate end to dust circulation
- Restored HVAC efficiency (15-25% energy savings)
- Improved indoor air quality
- Extended equipment life
- Reduced filter replacement costs
- Health benefits for occupants
DIY costs for comparison:
- HEPA vacuum: $200-400
- Cleaning supplies: $50-100
- Flexible brush and tools: $30-60
- Filters: $40-100 (multiple changes needed)
- Time investment: 6-12 hours
- Results: Partial cleaning only
ROI Consideration:For post-construction situations with heavy drywall dust, professional cleaning typically pays for itself within 12-18 months through energy savings alone, not counting health benefits and eliminated frustration.
Filter Replacement Strategy
Why Standard Filters Aren't Enough
After construction, your filter strategy must change:
Standard Builder-Grade Filters:
- MERV 1-4 rating (captures only large particles)
- Doesn't trap drywall dust (too fine)
- Dust passes through and recirculates
- Inexpensive but ineffective for post-construction
Post-Construction Filter Needs:
- MERV 8-11 minimum (captures particles down to 1 micron)
- MERV 13+ ideal for maximum dust capture
- Must be replaced frequently initially
- Balance between filtration and airflow
MERV Ratings Explained
Understanding filter ratings:
MERV 1-4 (Basic):
- Captures large particles only (>10 microns)
- Won't help with construction dust
- Use only if you can't afford better
MERV 5-8 (Better):
- Captures some finer particles (3-10 microns)
- Helps with larger drywall dust particles
- Good minimum for post-construction
MERV 9-12 (Good):
- Captures particles down to 1 micron
- Traps most drywall dust
- Recommended for post-construction period
- Balance of filtration and airflow
MERV 13-16 (Best):
- Captures particles down to 0.3 microns
- Maximum drywall dust capture
- May reduce airflow in some systems
- Verify your system can handle before using
HEPA Filters:
- Capture 99.97% of 0.3 micron particles
- Usually require system modification
- Not typically compatible with residential HVAC
Post-Construction Filter Schedule
Week 1-2 After Construction:
- Check filter every 2-3 days
- Expect to replace weekly
- Use MERV 8-11 minimum
- Don't be surprised at how quickly it clogs
Weeks 3-6:
- Check filter weekly
- Replace every 2-3 weeks
- Continue with MERV 8-11
- Dust accumulation should be decreasing
Months 2-4:
- Check every 2 weeks
- Replace monthly
- Can drop to MERV 8 if preferred
- Should see normal filter lifespan returning
Month 4+:
- Return to normal 1-3 month schedule
- Continue with MERV 8+ for better air quality
- Monitor for dust recurrence
Cost Consideration
Budget for filters:
- MERV 8-11 filters: $15-40 each
- First 2 months: 4-6 filters ($60-240)
- Months 3-4: 2-3 filters ($30-120)
- Total 6-month investment: $90-360
Compare to professional duct cleaning ($400-700) that eliminates the dust source entirely.
Phoenix-Specific HVAC Considerations
Desert Dust Factor
Phoenix homes face unique challenges:
Year-Round AC Use:
- HVAC systems run more hours than most climates
- Dust circulates more continuously
- Faster contamination and redistribution
- Higher energy costs from reduced efficiency
Desert Dust Plus Construction Dust:
- Arizona's naturally dusty environment compounds the problem
- Outdoor air infiltration adds to indoor dust
- Evaporative cooler users face additional challenges
- Monsoon season can worsen dust issues
Hard Water Impact on Coils
Phoenix water affects HVAC cleaning:
- Hard water mineral deposits on cooling coils
- Reduces coil cleaning effectiveness
- May require descaling during professional cleaning
- Affects both efficiency and dust adhesion
Timing Considerations
Best times for duct cleaning in Phoenix:
Fall (September-November):
- Before heating season
- Comfortable to have windows open during cleaning
- Moderate weather for system downtime
Spring (March-May):
- After heating season, before peak cooling
- Ideal temperature for cleaning work
- Prepare system for summer efficiency
Avoid:
- Peak summer (June-August) – discomfort during service
- Peak winter (December-February) – system needed for heating
Prevention for Future Projects
Protecting Your HVAC During Construction
If you're planning future renovation:
Before Construction Starts:
- Seal all vents completely: Use plastic sheeting and painter's tape
- Seal return vents especially well: Largest contamination source
- Consider shutting down HVAC: Use portable AC units during construction
- Create negative pressure in work area: Use window fans to exhaust dust outside
- Install temporary filtration: Box fans with MERV 13 filters in work area
During Construction:
- Keep HVAC off as much as possible in work areas
- Change filters weekly if system must run
- Use air scrubbers in construction zones
- Contain work area with plastic barriers
- Daily cleanup reduces overall dust
After Major Drywall Work:
- Wait to run HVAC: Give dust time to settle
- Vacuum and clean before turning system on
- Replace filter before first run
- Schedule professional duct cleaning if heavy work done
- Monitor closely for first weeks
Complete HVAC Cleaning Checklist
For thorough post-construction HVAC cleaning:
DIY Checklist:
- Turn off HVAC system completely
- Remove all vent covers and wash thoroughly
- Vacuum accessible ductwork at each vent
- Wipe interior surfaces you can reach
- Clean around vent openings on walls/ceilings
- Replace or clean current filter
- Reinstall vent covers
- Test system and monitor for dust
Professional Service Checklist:
- Camera inspection of ductwork
- Main trunk line cleaning
- Branch duct cleaning
- Supply and return vent cleaning
- Air handler cabinet cleaning
- Blower motor and wheel cleaning
- Cooling coil cleaning (if accessible)
- Plenum cleaning
- Filter replacement
- System testing and airflow verification
When to Call Professional HVAC Cleaners
Situations Requiring Professional Help
Don't delay professional cleaning if:
- Heavy drywall work: Any project involving:
- Multiple rooms
- Ceiling work
- Texturing or sanding
- Whole-house painting preparation
- System symptoms:
- Noticeable efficiency decrease
- Strange odors when running
- Visible dust blowing from vents
- Excessive dust throughout home
- Health concerns:
- Family members with respiratory issues
- Persistent coughing or sneezing
- Allergy symptoms after construction
- Anyone with compromised immune system
- Home characteristics:
- Large home (>2,500 sq ft)
- Complex duct system
- Older HVAC system with likely leaks
- Haven't had ducts cleaned in 5+ years
Questions to Ask HVAC Cleaning Companies
When hiring professionals, ask:
- "Are you NADCA certified?" (National Air Duct Cleaners Association)
- "Do you use true HEPA filtration?" (Not just "HEPA-type")
- "What's included in your service?" (Get detailed list)
- "Do you clean the entire system?" (Including coils and blower)
- "How do you access ductwork?" (Understand their process)
- "Do you seal access points properly?"
- "Is filter replacement included?"
- "Do you provide before/after camera inspection?"
- "What's your experience with post-construction cleaning?"
- "Do you guarantee your work?"
Red Flags to Avoid
Be wary of companies that:
- Offer prices significantly below market ($99 "specials")
- Use only contact vacuum without agitation
- Can't explain their process clearly
- Don't have NADCA certification
- Pressure you for add-on services
- Don't offer to show you camera inspection
- Won't provide references
- Aren't properly licensed and insured
Conclusion
Cleaning drywall dust out of air vents and HVAC systems is essential after any construction or renovation project involving drywall work. While homeowners can successfully clean visible vent registers and accessible ductwork, truly eliminating construction dust from your HVAC system almost always requires professional duct cleaning with specialized equipment and expertise. The investment in professional cleaning – typically $400-700 for comprehensive service in Phoenix – pays for itself through improved system efficiency, elimination of persistent dust circulation, better indoor air quality, and protection of your family's respiratory health. DIY vent cleaning should be considered a temporary measure or supplement to professional service, not a replacement for it. For Phoenix homeowners dealing with the double challenge of construction dust plus desert dust, addressing HVAC contamination quickly prevents months of frustration and potential health issues. Whether you're a homeowner who just completed renovation or a contractor preparing for final walkthrough, understanding that HVAC system cleaning is not optional after drywall work – it's essential for truly clean, healthy indoor air. The dust circulating through your vents won't go away on its own; it requires proper removal to protect both your home's comfort and your family's wellbeing.